Quadrants
Paint Shop Pro� 8
|
For this
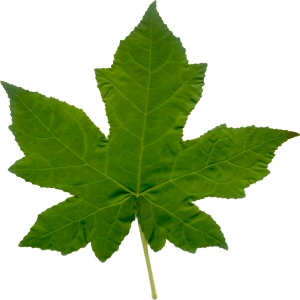
tutorial, I am using a scanned Maple leaf. The height is 300 and the width is 300.
Make sure you resize your image so that you can make 4
equal sized quadrants. You can do this by going to
Image/Resize and resize by pixel size and uncheck
Maintain aspect ratio and entering 300 for width and 300
for height.
Step 1:
Select two contrasting colors from your image with your
Eyedropper tool. |
 |
Step 2: Select your Selections
Tool  ,
then from your top toolbar, select the
Custom Selection box ,
then from your top toolbar, select the
Custom Selection box
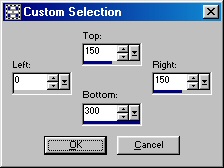
 . By clicking
on the Custom Selection box, a toolbox will appear, set it as shown in
Screen Shot 1: . By clicking
on the Custom Selection box, a toolbox will appear, set it as shown in
Screen Shot 1: |
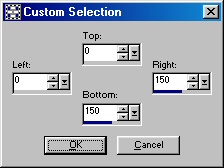
Screen Shot 1 |
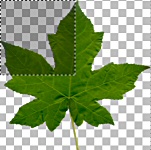
Step 3: Now the
upper left portion of your image will be selected. Choose
your flood fill bucket  , and you can either use these
settings or increase your Opacity settings to make the
flood fill darker. Flood fill with one of your colors
that you chose, I'm using black. , and you can either use these
settings or increase your Opacity settings to make the
flood fill darker. Flood fill with one of your colors
that you chose, I'm using black.

Screen Shot 2 |
|
Now your image
should look like this:
|
Screen Shot 3 |
|
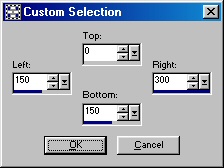
Step 4: Now
select your Custom Selections tool again and use these
settings to select the bottom left corner:
Step 5:
Repeat step 3 flood filling the top right quadrant, only use a different color or opacity. I changed
the color to #416F00 and used the same opacity to flood fill
with. |

Screen Shot 4 |
|
Step 6: Now select your
Custom Selections tool again and use these settings to select the upper right corner of the image:
Step 7:
Now pick a color you want to flood fill this third quadrant with.
I chose #808080 and flood filled with the same settings as the
last. |
Screen Shot 5 |
|
Step 8: Now select your
Custom Selections tool once again and use these settings to select the bottom right corner. |
Screen Shot 6 |
|
Step 9: Now
select another color to flood fill this quadrant in with.
I chose #FFFFFF for this tutorial. Now your image will
look like this: |
 |
To view an
example of this tutorial, please
click here
:
Home : : PSP Tutorials
: :
OE5 Stationery : : Applets
: : Friends : :
Frames :
: Awards : :Webrings
: : J's Web Design :
:
Inspired
Scripting : : Web Sets :
: Sign the
Guestbook : :
View the
Guestbook :
Copyright � 2003 Jacinda's Web
Design
